How to lay patio slabs on concrete
When it gets warm outside, the terrace beckons. Here you can enjoy balmy summer nights with a good glass of wine and let the warm wind caress you.
So that you can enjoy this too, we show you here how to lay patio slabs on concrete.
Important things to start with - the preparation
Before you start laying the patio slabs, you should consider and prepare a few things. First of all, your concrete substrate should be free of cracks and strong enough to support both the slabs and the bedding material (chippings, mortar, pedestals).
But the following things are also important:
Slope & water drainage
Concrete is a bonded substrate. This means that water cannot drain through this substrate - i.e. the slabs. This is why it is important to use the right Gradient and on the other hand, a Water drainage possible (for example with a drainage mat).
You should therefore proceed as follows with regard to the gradient:
- Check whether the concrete slab itself has a sufficiently large slope (2 - 3 %). This should lead away from your house!
- If your desired terrace slabs have a split surface, an even greater gradient is recommended.
- Concrete subfloor without slope: Create this (e.g. with screed). Important: Apply waterproofing beforehand (so that water cannot penetrate into the concrete or into your house adjacent to the terrace). Once the slope has been created, its surface must also be sealed.
It is best to proceed as follows with regard to water drainage:
- Apply the drainage mat to the concrete slab. Important: The slab must be sealed beforehand and have a sufficient slope!
- The drainage mat will later be invisible
- It is always used when patio slabs are laid on concrete, as it drains away seepage water and also prevents water from rising up into the slabs.
- This prevents frost damage and discoloration
Making the substrate flexible
Another usually important point is that patio slabs are usually laid on an elastic, i.e. flexible, substrate. As this is not the case with a concrete substrate, it must first be artificially created a flexible floor can be used. This often works with high-grade chippings.
However, it is also possible to lay tiles with mortar and adhesive for natural stone. This point is then omitted.
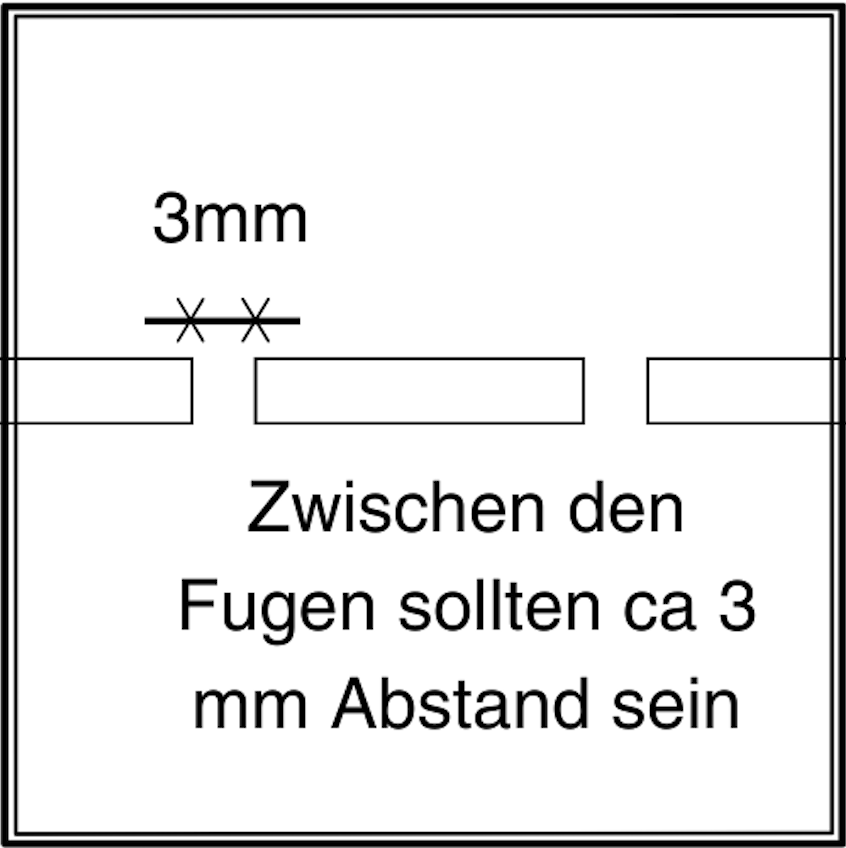
Plan joints
Last but not least, you should also keep in mind that Expansion joints should also be planned. These compensate for temperature fluctuations and prevent cracks from forming in the terrace slabs.
Are you looking for natural stone slabs for laying a new patio? Then take a look
You are welcome to visit our natural stones or take a look at our Contact us to us!
Laying patio slabs on concrete
As soon as you have installed the drainage mat and taken care of the waterproofing, you can start laying the patio slabs or tiles.
You can lay your patio slabs on a concrete floor in several ways: 1) using a bed of chippings, 2) a pedestal bed and 3) stone adhesive/mortar/drainage mortar. The materials for the paving bed are different in each case. We will now introduce you to these methods.
Method 1: Laying on grit bed/substrate
In this case, a layer of concrete is laid between the concrete substrate with drainage mat and the later terrace slabs (e.g. made of natural stone). Layer of chippings laid. This should be approx. 3 - 5 cm thick. For natural stone patio slabs, we recommend using high-grade chippings for the chippings bed.
If you still need to create the ground slope, you can, for example, add more chippings to the first lane than to the other lanes. After application, the chippings bed must then be plan deducted are laid. The decking slabs are then laid and tapped into place. It is important to use a rubber mallet here so as not to damage the slabs when tapping them in.
If you decide to use this method, we recommend covering the patio area with a Edging on the outside. This prevents the grit bed from slipping away on the outside. You have two options for this edging: Either you use so-called edging stones or you glue the outer row of your used patio slabs.
Tip: You can use a spirit level to check whether the slope has been maintained and whether the slabs are even. The straightness of the joints and slabs can be checked using a taut mason's string. If a terrace slab has been driven in deeper than others, it can be raised again and further chippings laid underneath. |
Your advantages when laying on a grit bed/substrate:
- relatively simple
- reasonably priced
- Panels can be replaced relatively easily at a later date if necessary
Method 2: Use a pedestal bearing
Pedestals are a type of stand that are attached to the concrete substrate. However, these should max. 10 cm high to be able to guarantee a completely secure footing. The tiles for the terrace can then simply be placed on the pedestals. A spirit level can be used to ensure that the slabs are level with each other.
This method also directly solves the problem of water drainage. Any moisture that forms can simply run through or off under the panels. This creates a Prevents water accumulation. It is therefore not necessary to slope the slabs themselves, but the concrete slab should have a slope.
Important: Laying on a pedestal base is not suitable for all types of natural stone. It is best to only lay hard stone in this way (quartzite, granite, basalt, etc.). |
Your advantages when laying with pedestals:
- Weight is saved
- Ideal for balcony/roof terrace
- Panels can be easily replaced later if necessary
- Entire construction can be removed again
- Pedestal supports already specify the spacing of the joints, which makes the work easier
- Slab bearings or mortar bags can also be used instead of pedestal bearings
Looking for natural stone slabs for your new patio? Then take a look around our website or contact us at Contact us to us!
Method 3: Use adhesive, drainage mortar or drainage concrete
Here, the terrace slabs are laid directly onto the concrete substrate (with drainage mat) and fixed using an adhesive, drainage mortar or drainage concrete. This adhesive/mortar/drainage concrete should be Frost-resistant and suitable for natural stone slabs be.
First, you must mix the drainage mortar according to the instructions on the package. This is then applied to the concrete floor or drainage mat in a layer approx. 3 - 5 cm thick. Then apply flexible adhesive to the back of your natural stone patio slabs and press the slabs into the mortar bed.
It is important that the Laying "wet in wet" is carried out. This means that the adhesive and mortar must still be wet when laying. You must therefore either protect the mortar from drying out or only mix it gradually.
Again, a rubber mallet should be used to tap in the tiles and a spirit level helps to lay the tiles properly.
Tip: You can also make your own drainage mortar. To do this, you need a 6:1 ratio of high-grade chippings and trass binder. |
Your advantages when laying with adhesive:
- Tiles are laid very firmly
- A fixed paving joint is possible
Typical mistakes when laying tiles on concrete
- Missing gradient: Frost damage & discoloration on natural stone slabs
- Lack of sealing: Water penetrates the concrete slab and/or the masonry of your home
- Missing joints: Stress damage due to insufficiently planned expansion joints
- Wrong grit bed: Chippings that are too cheap can lead to discoloration or rust stains on the tiles
- Wrong mortar: Can lead to water damage, frost damage or discoloration
Are you unsure or do you still have questions? Then please contact Contact us to us! We will be happy to help you.
Laying patio slabs on concrete: our finishing tips
Whether laying with pedestals, mortar or chippings: some tips for laying terrace slabs are effective across the board.
- Joints: You can fill these with quartz sand or grout. Grout is somewhat easier to clean.
- Anti-soiling: Terrace tiles should always be protected from soiling when laying. Therefore, lay a film over tiles that have already been laid.
- No trespassing: When laying the tiles and afterwards, you should not walk on them for a while (at least 24 hours). They are only fully loadable after approx. 7 days.
- Tools required: In almost every case, you will need a spirit level, a rubber mallet, joint crosses as a joint aid and pegs with a cord. Depending on the method, you may also need a scraper rail.
Design tip: Think about the shape
If you want to lay patio slabs, you should first think about what the design or pattern of your patio should ultimately look like.
Most tiles are laid in a half or cross bond, but you can also get more creative and go for a herringbone, rose point or Roman bond pattern.
Ideas for the tiles on your new terrace
Are you looking for inspiration and design ideas for your new patio floor? Then you can read here which slab colors and stone types are possible:
- Simple & modern: If you lay light gray slabs, you get a modern yet simple design. Combined with stainless steel or dark furniture, your patio will look elegant and sophisticated.
- Extravagant: Dark tiles (e.g. slate) make your patio elegant on their own. These dark natural stones are best combined with lounge furniture.
- Rather rustic: Sandstone slabs are suitable for a rustic look. These are available in monochrome and multicolored. Reddish slabs made of fired clay also radiate a sense of coziness.
- Italy for at home: If you prefer a Mediterranean and natural look, broken terracotta stones laid in a random pattern (without a fixed pattern) are suitable.
- Everything once, please: Whether several types of stone or a dark gravel bed with light-colored tiles - a mix of materials can also have a great effect.
You are also spoiled for choice when it comes to design and pattern:
- Small but mighty: If you want to lay creative patterns, it is best to use small stones. These are particularly good for creating such designs.
- Small & large in combination: Combine small stone paving with large patio slabs to create a real eye-catcher.
- Go big: XXL slabs are particularly trendy. However, we recommend using them on spacious terraces so that they can really come into their own.
- Playful: You don't just want straight patio slabs? Then install mosaics! These playful details can be laid with small, colored stones.
We will be happy to assist you and your new terrace and answer any questions you may have. Please contact us Contact us to us!